Wednesday 23 March 2011

Bones

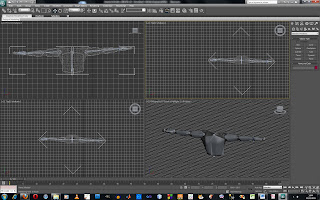
The lecture showed us how to add bones to a body and then manover them in specific ways. The lecture gave us a torso shape to work with and explained how to add bones to the arms and torso. This is done by creating bones inside of the object, and then linking them to the torso using the skin tool.  This can be difficult to get right at first but using the front, back and side bones tool i managed to position the bones in the centre of the torso object.

Working on the bone structure inside of StudioMax.


This ment it was easier to arrange body parts and will make animating objects much easier. To show an example of this I created a short animation using the boned torso.

A short animation using the boned Torso.

Tuesday 22 March 2011

Morphing Heads

This week we morphed a human head, using seperate techniques. There is a tutorial missing, which included bone structures on models which will follow shortly. The head was turned into an editable polygon and then cloned around 10 times. This then allows me to make individual changes to each head and then use the seperate head items in the animation at different times. For example the shocked face at the end of my short animation was used using 4 different head items, including the two eyes, both from different heads, a smile item and an open mouth item. Creating the smile was created using both the smile and closed mouth items combined, making the mouth appear more realistic.

TurboSmooth is also only applied to the key head where the morphing tool is initiated, meaning less time and trouble creating new face items.


A head using the morph tool inside 3D Studio max.


The animation was tricky even though very short as I would continuesly set key frames some items while leaving others without them, meaning the animations items would merge at times they wernt suppose to. This ment deleating key frames and starting the animation over several times to get into the habit of locking each head item at every key frame.


My finished short head animation.


Tuesday 8 March 2011

Animation

My first attempt at animation lead me to create a ball, and use the curve tools to makes a bounce line. I then editied the shape of the ball to give it the appearence of squashing, and then looped this animation. I then created 2 more copies, with the same animation and used the dope sheet to offset one ball to be delayed, and one to be ahead of the first ball, meaning that all 3 balls bounce at slightly different times. I then followed to do my first full animated render and have uploaded the product above.

Friday 4 March 2011

StoryBoard

For my animation i have decided to follow the same path as one of the first scenes in Quantom Of Solace which is the car chase. I enjoy this scene the most because of its cars and gunfire. The trailer will include other scenes but for the time being the animation I want to create is mostly to do with this opening scene. I don't want to follow the full scene as i would like to have my own parts inserted aswell. The storyboard shows most of the key scenes in the first chase scene and will work as a template for my trailer.


The car appears, showing seperate parts of the car with cuts to black between each shot.


The scene will include multiple shots like these with gun fire, fast driving and hopefully a slow motion bullet shot, with a 360 pan around the bullet in motion.


The trailer will end with the enemies being killed and some sort of explosion. James Bond will then leave the shot, back to the camera however I have not decided how, either in the DBS/9 or on foot, holding the G36 model.

James Bond Model

The third model i created was a rendition of James Bond. At this point I ha used up most of my time creating the Aston Martin and so set out to create a basic model with some detail, which could be improved upon as needed. I feel I accomplished alot more then i set out to achive and am happy with the final basic model. The only thing needed to be edited with it is the facial features need to be created.

I started by creating a block outline using one box and then creating more polygones from it, much in the same way i created the Aston. This took a relitivly small amount of time as the body didnt need to be detailed at this point.

First Wireframe pospective of model.

After doing this I decided to use a different technique which would make the model a lot more symetrical. Therefore I cut off half of the models body, and made the detailed alterations to only one half. This then ment that I could mirror the model, flip it and then add it using the Boolean tool. After doing this and creating one object I just needed to wield the 2 halfs together to create one body model.

One half of the model.

The 2 seperate halves of the model after using Boolean to join them, but before i started wielding.

The body after the Boolean tool was used and wielding was complete.

I then added a meshSmooth and turboSmooth effect to my model which then created a much smooth, realistic body shape for my model. This was key to creating a set of cloths for the model that would fit well. To create the cloths I used the garment marker tool which effectivly uses a set of vertexs and seams to join the two together, creating 3D polygons. This took time to understand but created some very realistic clothing for the character model and could be used in many other useful ways.

The model with meshSmooth and turboSmooth in effect.

Using the garment tool and adding seams onto the model.

Using the garment tool and adding seams onto the model.

The option section of the cloth tool, choosing what material and how the material will wrap.

The option section of the cloth tool, choosing which object to collide with, in this case the character model. This makes the 2 parts conect around the model.

The model with both shirt and trouser cloths designed and resized to fit correctly.

After this I then went on to creating the shoes and face for the character. The shoes took little time and the face started off as half a face. The face was created by using a box 6x6 and then moving vertexs to create detail. I created a basic shape for the face and then saved this as a seperate model. The face was then mirrored, rotated and joined to the otherside using the boolean tool. Once this was created i used the turboSmooth tool to smooth out the lines creating a very basic head shape with little detail. I did this for 2 reasons, the first oviasly being the time restrictions, but secondly being that im not sure whether the head will ever face frontways in the animation, and therefore detail might not be needed on the model.

The first half of the head.

The 2 halfs being joined together.

The final render.

The final model does still need work to be done on it, mostly being detail and reshaping to the head, although im still very happy with the way the cloths look on the model and the basic model shape. Im also happy with the tools that i have learnt as I learnt even more tools then when creating the Aston Martin and feel I could create more and more detailed models the more I Progress.

Aston Martin Model

For my second model i decided to test myself and my ablilitys and create a model of an Aston Martin DBS. This would be difficult for me as up till now I have done very little modeling and only learnt several tools, however throughout creating this model i have learnt meny including the chamfer tool, used mostly to create the wing mirrors.

The first problem hit straight away as after hours of searching i came to the conclusion that there was only 1 set of schematics for a DBS and these where not to scale and difficult to see. After attempting to draw it using images of the car i decided to change the design slightly by designing an Aston Martin DB9, which is close cosmeticly to a DB9 already. This was a problem at first but considering the vast amount of schematics for the DB9 it was a good choice to change.

Once I set up the viewports and arranged the bitmaps I started by creating the cars inner wheel arch using a simple tube and then cutting the parts I didnt need. This was only done on one side however as I was only planning on creating one side of the car and then using the symetry tool to make it a full DB9. After I created the wheel arches I then proceded to create new polygones from the wheel archs and continued to do so to create the basic shape for the car. This is a time consuming method but for me I felt it was the least complicated method.

Car Wheel.

After the basic shape was complete I went on to design a wheel and inside alloy for it. This was done by creating 2 tubes and making one smooth (having more sides) and then making the size of each look correct. The back was created with a plane but now nowing how to effectivly use the cap and flip tools I will change the plane for a face made from the tubes.

Car half before Symetry.

The car now had 2 wheels, a basic shape, and cut out sections for windows. This had already been quiet time consumming and a third model was still needed to be made. I moved on to mirror the car using the symetry tool and then copied and moved both tires to create 4 wheels for the car.

The Aston Martin in wireframe mode, with completed shape and wheels.

The next step was to then start creating the windows for the Aston. The way i did this was by selecting the windows outlines, extruding them slightly to give depth, and then fill them with a seperate object. This object started as a box with multiple vertexs, which where slowly lined up with the window edge to create smooth windows. This was done for both side, front and rear windows.

Car before windows where created.

Car after windows where added.

The next step was to create headlights for the car. I found this to be one of the more difficult parts as i had trouble making them look relistic. Infact i took several long attempts which proved to end with unrealistic models(See below). Eventually i managed to create something that looked more realistic by extruding a small gap in the car, and then using the same technique I used for the windows, cover up the holes I had created.

A failed attempt at creating headlights.

The final headlight design, looking a lot more realistic after using the turboSmooth tool.

The next thing to create was the wing mirrors. I did this by creating a block, shaping it and then extruding a space for the mirror block to be placed, like the window. The back was then curved and the shape was created using the chafer tool to create smooth corners. A box was then used to create the mirror and it was fitted the same was as the windows. A small cylinder was then added to use as a conection between the car and wing mirror. After this was fitted i then copied and mirrored a second wing mirror to fit on the opposite side.

The starting mirror block.

Using chafer to curve the corner of the wing mirrors.

The windg mirror having its rear end curved for a more realistic look.

The wing mirror design without the mirror or cyclinder.

After completing the model I then proceded to texture all of the different aspects of the model. The car and wheels where textured with car paint black/gray/silver whith the alloys being a slightly lighter silver. The windows and and lights where then textured with a reflective material with a 50% decrease in its alpha, meaning that they appeared more as black out windows. This was done because the interior of the car was not created, as this would be a waste of time for the animation.

Final Rendition of the model.

The model was eventually finished with some detail. I would still like to work on it and add more detail such as working lights, front and read grills and door handels, but these are small editions that can be made later on.
MoodBoards

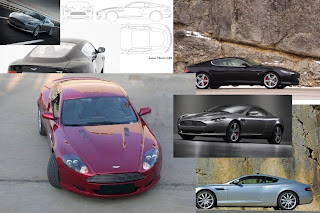
My mood board are boards filled with images i used to create my models for the James Bond Quantam of Solace trailer. These where used throughout my development of the models and used as refferences as well as inspiration. These images are ranged between the G36 gun, Aston Martin DB9 and the James Bond character model.

Aston Martin MoodBoard.

HG36 MoodBoard.

James Bond MoodBoard.